Shabby-chic, shabby-vintage, anything but plain shabby! The most difficult decision for me, was what not to do with it. This could look great as a painted photo frame, of course, but what about a chalkboard, memo board, jewellery board, pin board...?

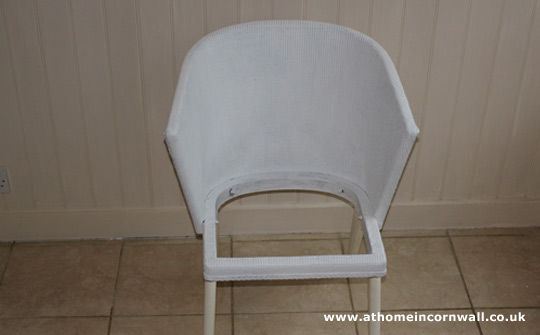
Chair – Lloyd Loom Style

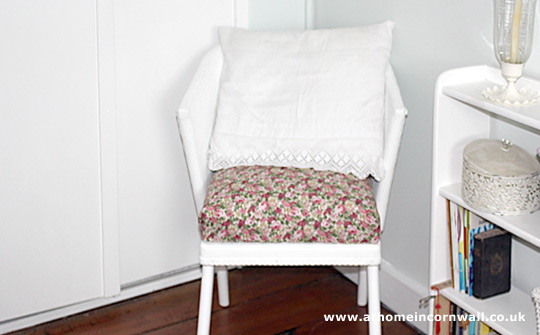
While chairs like this can cost anything up to £200 new, they can also be picked up from around £25 second hand. When I first saw this chair it was quite a vision – it had been painted a striking dark blue with a matching cushion. I imagine it was used in a child’s bedroom or similar, but its cosy and welcoming shape spoke to me immediately and I thought, taken back to white, it could make a decent gift for my Mum. The paint pot was immediately prised open…
You will need:
- Undercoat
- Topcoat for the main part of the chair
- Satin paint for the wooden supports of the chair
- Fabric for the cushion – enough to cover the top, sides and bottom of the seat plus some extra.
- Wadding for the cushion
- Upholstery tacks if necessary
- Clean the chair all over then sand and wipe the woodwork to give a good key and clean the rest of the chair adequately for the paint to adhere.
- Because my chair was such a vivid colour to begin with (no photo I’m afraid!), I had to apply 3 coats of undercoat all over, leaving the recommended drying time between each coat. Obviously you only need use as many coats as necessary to give your chair a good base colour, but I always think it’s worth spending time on the undercoat(s) as this will affect the overall finish.
- Apply at least 2 top coats to the main part (excluding the wood), leaving ample drying time between the coats.
- Paint the woodwork with the satin paint – 2 coats minimum.
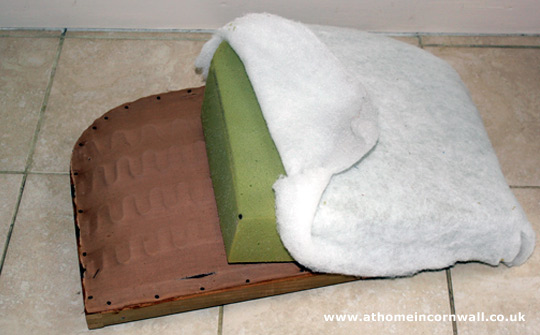
- The foam seat was unusually deep so, with a long (kitchen bread) knife, it was easily (but carefully!) cut in half. If the seat of your chair isn’t in good repair, any shop selling similar foam will usually be cut it to size and shape for you and it’s usually fairly inexpensive.
- Wadding on top of the foam helped to soften the edges and simply needed to be cut to size, allowing enough to cover the sides of the foam. This did not need stitching into place as it clung to the foam like Velcro!
The most difficult bit of this project was covering the seat. You may find it helpful to read some upholstery guidance at this stage, however this the following worked well for me.
- Allow yourself plenty of fabric and cut the excess afterwards. I cut my fabric allowing enough to cover the top & sides of the seat, plus a couple of centimetres turned in all the way around (to give a neat edge) AND enough to cover the underneath. I did this in one piece, however, it is probably recommended that you add the piece underneath separately afterwards to give a professional finish. With the fabric underneath (right side down), top with the wadding, then foam, then the upturned seat itself. At this stage I’m sure you will appreciate a second pair of hands to help you keep this steady while you hammer the tacks into the front (straight) edge of the seat first. Work your way around the seat, tacking the fabric to the seat and turning the whole thing the correct way up as you go, to check the fabric is laying smoothly for a neat finish. It is worth taking your time over this and don’t hammer the tacks all the way home (flat) until you have been all the way around, as it can be very difficult to pull out the tacks to adjust the fabric otherwise.
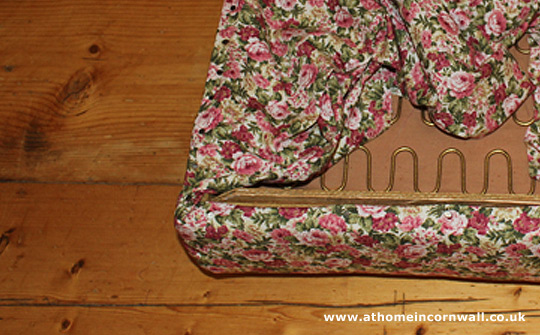
- When I had covered what would be the top of the seat, I used the excess fabric to cover the underside and tacked it in place.
- Pop the seat back on and admire your hard work!
Alternative ideas – I kept the chair one colour and chose a fabric to suit the chair’s soon-to-be new owner. However, if you want to bring a piece of summer into your room this chair could also look great with more of a shabby chic finish. Perhaps a pale fabric, dry-brushed paintwork and a lovely old fashioned crochet cushion dropped on top to give an aged feel to the whole piece… you could even take it into the garden on a lovely balmy day. Hmmm, I need to find another chair…
My Mum… Is one of those people who can’t resist fabric and re-making things. We often take the mick – with just cause, I’d say – because anything that comes into her house is usually re-made before it leaves again. We’re not just talking curtains into cushions here; more like a hankie into a bed cover as she can sew/knit/crochet just about anything. Her sewing room is a proper Aladdin’s cave, of course, like a sweet shop for grown-ups which means we love to sneak up there while she’s not looking..!